Tuesday 14 October 2014

Simplicity 1653

Simplicity 1653 is a mock wrap dress pattern for knits with three different sleeves and two lengths to pick from. It is also one of the Amazing fit line of patterns. 


To achieve an amazing fit, different bodice pieces are supplied based on cup size. By using your high bust and full bust measurements, you can work out which is the right one for your size. There are also options for different skirts based on slim, average or curvy. Although a little confusing at first glance, it is well explained in the instructions how to select the correct pieces.


I started with size 12 for the shoulders and arms, grading out to 14 (cup B) at bust and 16 at the waist and hips. 
Simple enough construction with 1" seam allowances in places to allow for better fitting. The instructions have you baste all these seams wrong sides together so you can fine tune the fit. I skipped this bit as I felt removing basting stitches would be a bit of a pain, so I winged it.


The wrap is quite flattering. The pattern instructions have the dress knotting on the left  side though I have wrapped them right around and knotted on the right in these photos. I realise now that this is probably not the most flattering. 


I have plans to make a long sleeve version in grey John Kaldor jersey that I have stashed away. 
Hopefully in time for the Curvy sewing collective wrapalong 
Thanks for reading 

Thursday 18 September 2014

OWOP Challenge 2014


Hello again! I signed up for this year's OWOP hosted by Handmade Jane. 
I selected New Look 6123 as I have made quite a few dresses based on this pattern. For my work I have to be presentable looking, tidy but not necessarily office attire.


Day One 
My boys had their birthday party, so my house was full of children high on sweets and cake. Comfort was key as I tried to keep them under control. My grey leopard print ponte version was most suitable.

Day Two 
FAIL! I'm afraid none of my dresses were suitable on day two. I had to clean the house and tackle the mountain sized pile of ironing after a busy week of work, birthdays and cake making.

Day Three 
Green and black wool version mainly to show one of the receptionists at work. She also sews and had missed seeing me when I wore it the week before. 

Day Four
I wore the version with the floral skirt and the blue pleated neckline.


Day Five 
Grey wool tweed version with the little hearts

Day Six 
I made a new version! I changed to a notched neck this time. I was trying for more of a sharp angle on the notch but ended up with a gentle sort of a curve. I will perhaps do a separate post on this dress but I am probably the worse blogger ever. I have been sewing away and have quite a few finished items to share but find the process of taking photos and writing quite difficult. Must try harder


Day Seven 
Only repeat of the week 


Overall I enjoyed the week (didn't enjoy the selfies though) 
Dresses make up the bulk of my wardrobe, they suit my lifestyle extremely well. Not much styling was required as we were having an unusually warm week, so dress - shoes - DONE. When trying to get three uncooperative boys out in the morning time I need easy options.

So what's next??
I have plans for some jackets - this good weather wont last much longer :(
First up a modified Sewaholic Minoru and then either Colette's Anise or Cynthia Rowley 6188

Also planning to join in my first sewalong with the curvy collective wrap dress sewalong . I'm not plus size but I'm sure they won't mind if I join in. I love a good wrap dress
Okay until next time

Tuesday 5 August 2014

Archer by grainline and me

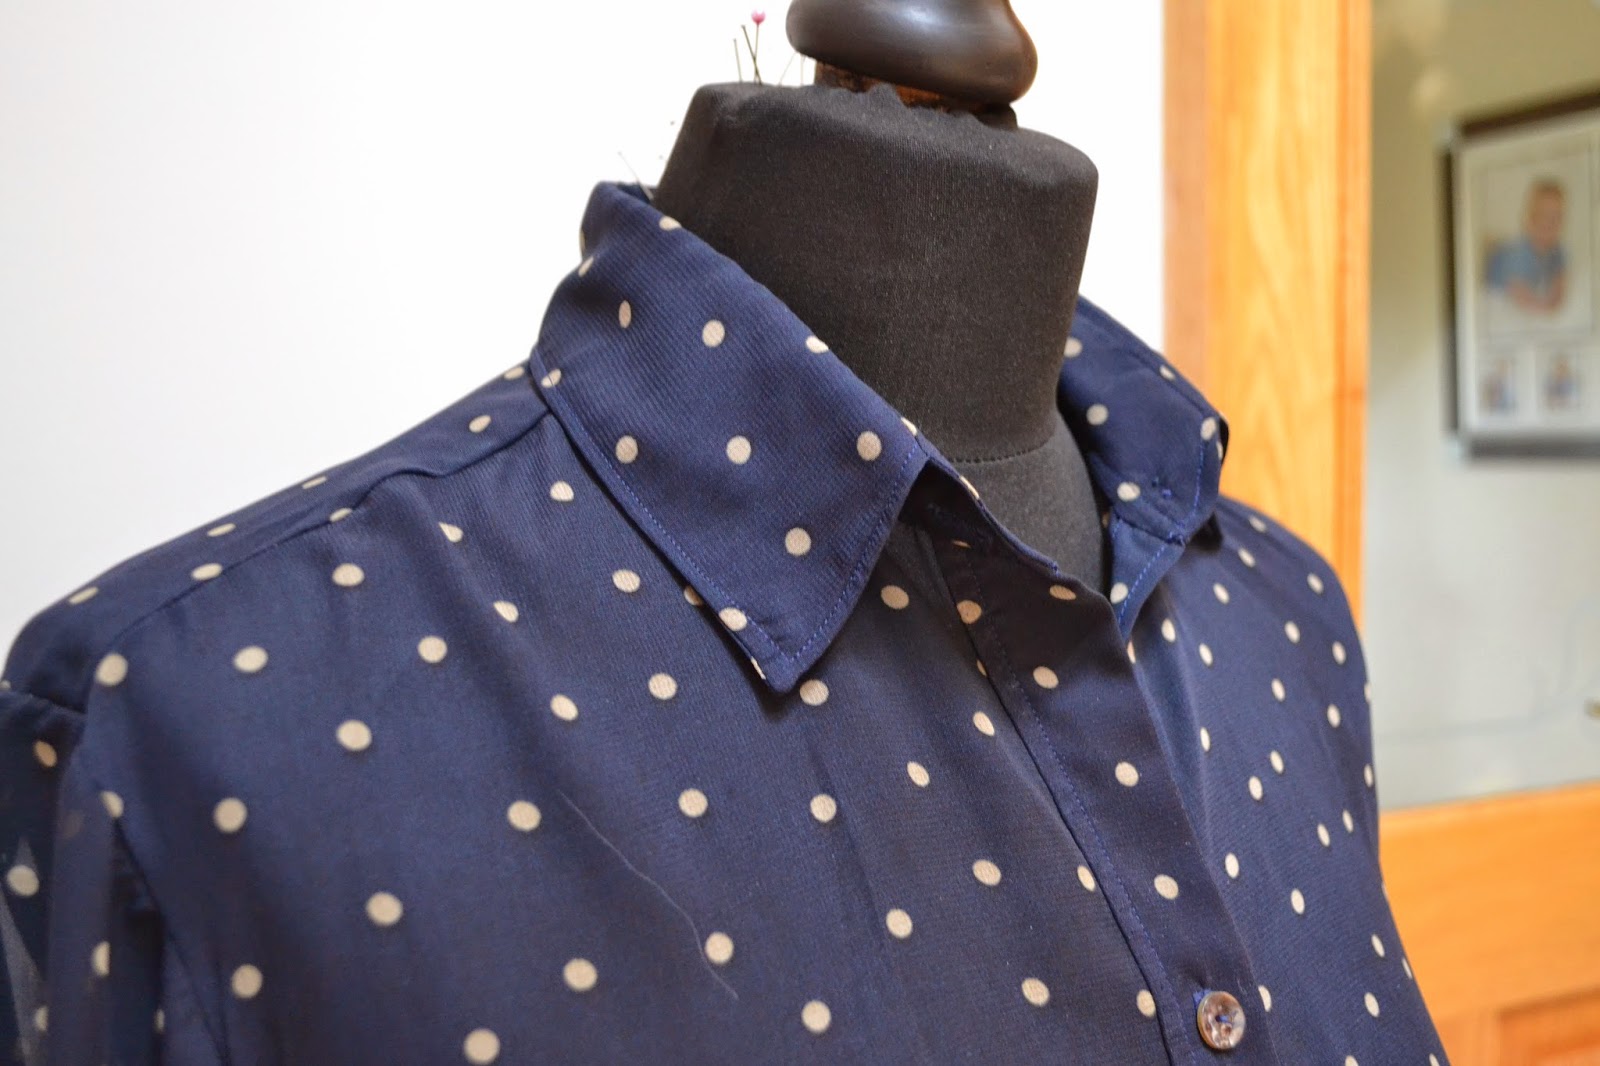
This is the Archer shirt from Grainline which really needs no introduction as I think I am the last person in blog land to make one (or three) up. 


I have made this one in a navy georgette with small beige spots, from my Goldhawk Road haul. Previously I would have called this chiffon but I am in the middle of making up a different blouse from NL6107 in chiffon. And it is some slippery s*** whereas this was manageable. 


I originally cut this at size 4 for neck and shoulders grading out to size 8 for the bust waist and hips. Later I took about an inch out of the side seams grading out to nothing at the hips. I cut the length at the size zero line as I'm very short, also took an inch out of the arm length. They are still about two inches too long but I always roll my sleeves up so no biggie. 
I originally intended to add sleeve tabs to help keep the sleeves rolled up but got carried away with the sewing and only remembered when I had the sleeve seam closed. At that stage I thought it would be too difficult to try and add them in... Ahh well next time!


The biggest problem I had was the buttonholes. More of a problem as my machine has a 4 stage buttonhole and this tricky to get it all lined up and back to the point where you started. Add in the slightly sloppy fabric and it was a bit of a nightmare. To help I put some tissue paper under whilst sewing and this did help to stabilise things a bit. 
For the collar I used Andrea of four square walls tutorial and this turned out to be my best collar yet. 
I went for brown tortoise shell type buttons after getting some help choosing via Instagram. 
I think I have mentioned before my problem with interfacing (someday I might conquer this probable irrational fear ;) 
This sheer fabric did need something for the collar, cuffs and button bands so I used some navy cotton lawn which I salvaged from the lining of an old summer dress. Good colour match and gives a bit of stability. 


I asked my 8 year old niece to take a few photos of my new shirt. This is the only usable one and I look like a lunatic. Blog photography ain't easy :)

I have also made two more Archers, one blue and white striped shirting from Truro fabrics and a pale pink shirting from the Goldhawk Rd. 


I am keen to get more involved in the sewing community but I having bother leaving comments on blogs (even on my own).
 Has anyone else had this issue or know what I am doing wrong?
Thanks for reading


Friday 18 July 2014

Hello again. 
I am back with Surprise Surprise!!! yet another hack of New Look 6123.
I guess I'm a bit of a lazy sewer. 
Well more of a lazy fitter, once I get a pattern fitting well I tend to make a few versions (or in this case alot of versions) so I can avoid the hassle of fitting again for a while.
I originally set out to copy this dress that I had seen on pinterest

I really liked the neckline pleats. So I took the front bodice piece from NL6123 which has waist and bust darts. To recreate the pleats on my Pinterest dress, I drew lines from the bust point up to where I wanted the pleats to fall at the neckline.Then I did a bit of slashing and spreading. I closed the darts at the waist and took some of the width out of the bust darts, which allowed the slashes towards the neckline to open up.
After a bit of trial and error on paper , I was able to work out how I wanted the pleats to form.


So when I headed to my sewing room to start this I realised that the blue crepe I had selected for this was an excellent match for a remnant of cotton sateen from Fabric Godmother. Happy accident. 
I decided to shortened the bodice and make a waistband. 


I love how this dress turned out, it is quite dressy and I wore it to my niece's christening where I had Godmother duties to fulfil!
Here a photo of me in my frock taken by my sister who was barking commands "No, No, No this way" "Suck it in" "Bend your leg!" Ha Sisters :)

In other news, I have signed up for Handmade Jane's OWOP challenge. Bet you can't work out what pattern I will be using.
See you all later 

Friday 4 July 2014

The many faces of New Look 6123


You could say that I kinda love this pattern. I have made this many times and there will be many many more versions. It comes with two bodice variations, two skirt variations. three sleeve options and a skirt flounce. But this a great basic bodice and skirt pattern and I have been using it almost like a sloper.


For the first version I used a grey with black hearts wool fabric from ebay store iana fabrics. I lowered the neckline slightly and went with the straight skirt with the sleeve flanges (odd word that flangeeeeeee). Apologies for these photos, my mannequin isn't quite as busty or hippy as I am. It is fully lined and has an invisible zip. I'm rather proud of my zipper and dart matching on this dress. This wool was lovely to work with and pressed really well . My flanges look a bit droopy here but haven't noticed this IRL. This is probably cos I haven't interfaced them. Interfacing and me have failed to see eye to eye so far, always a bit cardboardy......


Version 2 was inspired (or pretty much copied) from this dress that I saw on Diary of a sewing fantatic. I already had the fabric in my stash but was unsure what to do with it.


As you can see, I used the sleeveless bodice and straight skirt and added waist tabs. 


The bodice and the skirt were joined and the back darts of each merged to form fish eye darts. The waist tabs were taken from Simplicity 2588, incorporated into these darts and attached at the front with some buttons saved from an old skirt.
I tweaked the bust dart placement by moving them about an inch towards the centre front on this dress. Once again this one is fully lined. The pattern doesn't include linings pieces but I always like to add them especially to a dress like this for work as dresses sticking to my tights drives me slightly mad. The pattern matching worked out very well especially as I squeezed this out of just a yard of fabric.

Okay just one more today if anyone is actually still with me.
I used a ponte jersey for this one, adding cap sleeves with pleats at the top. I also added a zip but really don't need it as this pulls on and off easily. A very easy and comfy dress to wear.


Okay thanks for reading and I will be back soon with more. 


Monday 9 June 2014

Birdy Chantilly

Hello there again 


I purchased this bird fabric in the Goldhawk Road recently. 

I can't remember which shop as it was a quick 1 hour dash around, I was in the city for a conference and needed to catch my flight home. The fabric is a chiffon but was surprisingly easy to work with. 


I had previously made up the Colette Chantilly last year from a cotton lawn but the lining I used was quite thick so the skirt ended up very poofy. So I was keen to try this out again in lighter fabric. It is lined with some black superior lining from Truro Fabrics that was left over from another dress. I love this lining fabric, at £9 per metre, it is more expensive than your average acetate lining but it is silky and not static, clingy or sweaty. Well worth it. 

I usually Google any pattern before I start to get an idea of any issues I may come across in fit or construction. There was only one post I could find specifically on making up the Colette Chantilly in Chiffon. That reviewer felt the Colette instructions for the version made in sheer fabric were a bit lacking. So I was worried about seam finishes and how the yoke would look in the sheer fabric. However, I found the instructions to be very clear and easy to follow. I think the only thing I did differently was understitching the yoke. I used to skip the understitching, thinking Ha that's not really needed ... onto the next (more exciting)step. But it really does make a difference to the finish to your garment. I overlocked all of my seams and for the hem I overlocked it and turned a narrow hem. 


Having sewn this up before made for a relatively quick sew. I cut a size 0 for the yoke, size 4 for the bodice grading out to a 6 for the waist and skirt. The skirt was cut at the shortest length on account of my short legs. 

The only real difficulty was inserting the invisible zip, which I ended up putting in by hand. I should really have reinforced the chiffon with interfacing to support the weight of the zip. After sewing it with my invisible zipper foot, it was far from invisible, in fact it looked bloody awful. 
So I ended up fixing it up as best I could, an hour before we were due to go to a family gathering. Last minute stitching despite being a quick sew ummm maybe need to get better organised 


Overall I like this dress, despite the poor pattern placement on my chest, ha which my husband pointed out just as we were getting ready to leave. 

Wednesday 4 June 2014

a href="http://www.bloglovin.com/blog/12370495/?claim=qfpmnc5q7gj">Follow my blog with Bloglovin</a>

The First Post

Okay then, here goes nothing .... my first blog post.

The sewing indie (hondabuss) month competition had finally given me the push I needed to start a blog!!! I am more nervous about this than I really should ...Right ?!

I have been sewing for myself for a little over a year now and I absolutely love it. 
Some would say I 'm verging on the slightly obsessed.

So far I have made quite alot of dresses and I do love a good frock. 

So first  up 

This is a hack of the Dixie DIY ballet dress . 

I have gotten serious use out of this pattern, I think it is a great basic pattern that can be hacked many different ways and so far I have made at least six variations. Not bad for the few dollars I paid, though I think Dixie has increased her prices recently, $8 is still a good price.

I left the sleeves off and changed it to a V neckline. The bodice is self lined and the armhole was finished using this great Colette tutorial. The ballet dress comes with a semi-circle skirt but I swapped this out for a maxi gathered skirt, just using the full width of my fabric. I also added pleats at the front shoulder which are crappy pleats but the busy fabric means these are not that noticeable. 


Overall this is a great comfy dress and the best bit is a finally have a maxi dress that fits me! When you are barely 5ft tall, you learn to bypass maxi dresses pretty quickly when shopping. Yah for sewing for me !
Here is an awkward headless photo of me "modelling" 

This blogging business could take alot of getting used too.